Working with Flows
Learn how to create, configure, and execute test flows for automated web application testing with Rock Smith.
What Are Test Flows
Test Flows are reusable test scripts that define a sequence of actions and assertions for testing web applications. Unlike traditional selector-based testing, Rock Smith flows use semantic element targeting—identifying elements by their visual appearance and context rather than brittle CSS selectors.
Each flow consists of:
- Steps: Individual actions the AI agent performs (clicking, typing, navigating)
- Assertions: Validation checks that verify expected outcomes
- Element Targets: Semantic descriptions of UI elements with visual cues
Creating Flows
Rock Smith offers two ways to create test flows:
Manual Creation
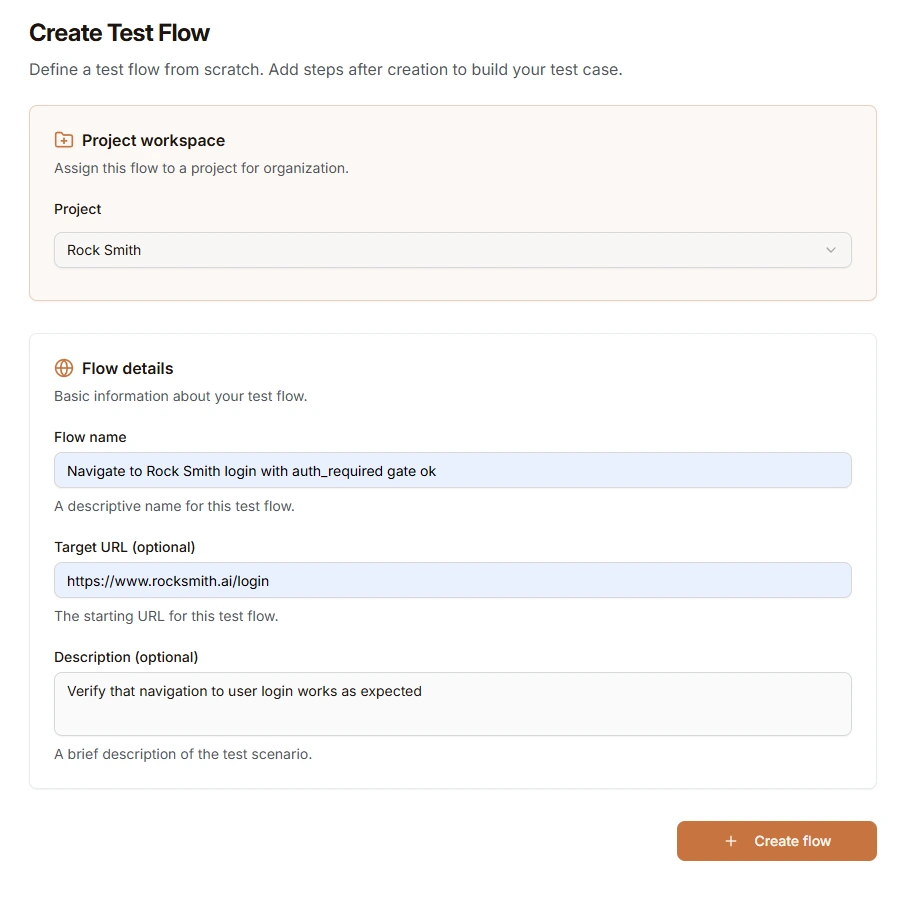
Define a test flow from scratch with full control over each action and assertion. Steps are added after the flow is created.
- Navigate to Flows in the sidebar
- Click New Flow
- Select a project from the Project workspace dropdown
- Enter flow details:
- Flow name (required) - A descriptive name for this test flow
- Target URL (optional) - The starting URL for this test flow
- Description (optional) - A brief description of the test scenario
- Click Create flow
- Add steps using the step editor:
- Select an action type
- Configure action parameters in the Action tab
- Define element targets in the Target tab (for interaction actions)
- Add assertions in the Checks tab
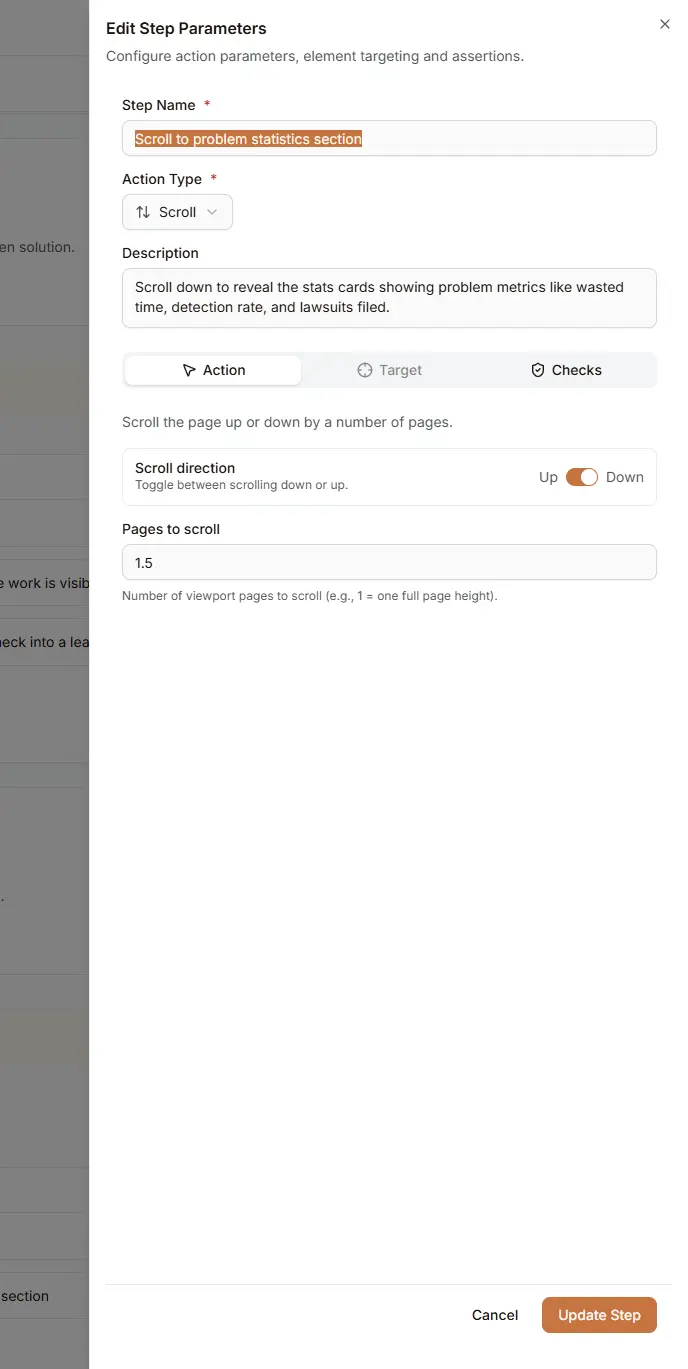
Step Editor
The step editor provides a comprehensive interface for configuring each step in your flow.
The editor includes:
- Step Name (required): A descriptive name for this step
- Action Type: Select from 19 available action types
- Description (optional): Additional context about what this step does
Editor Tabs
| Tab | Purpose |
|---|---|
| Action | Configure action-specific parameters (e.g., scroll direction, URL to navigate, text to type) |
| Target | Define semantic element targeting for interaction actions |
| Checks | Add assertions to validate expected outcomes |
Generate from Discovery Data
Automatically generate test flows from completed discovery sessions. This method uses the visual contexts captured during discovery to create comprehensive test flows with assertions.
- Run Discovery Sessions on your site first
- Navigate to Flows > Generate Flow
- Select the target project from the dropdown
- Review the Project Discovery Data:
- Completed Sessions
- Visual Contexts
- Existing Flows
- Click Generate Flows
- Flows are generated asynchronously in the background
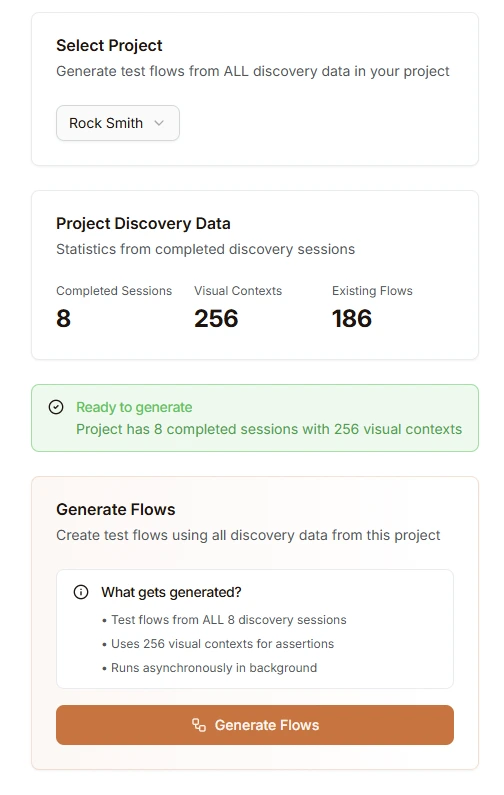
What gets generated:
- Test flows from ALL completed discovery sessions in the project
- Flows use captured visual contexts for assertions
- Generation runs asynchronously in the background
Navigating Flows
Rock Smith organizes flows in a hierarchical tree structure, making it easy to manage large test suites.
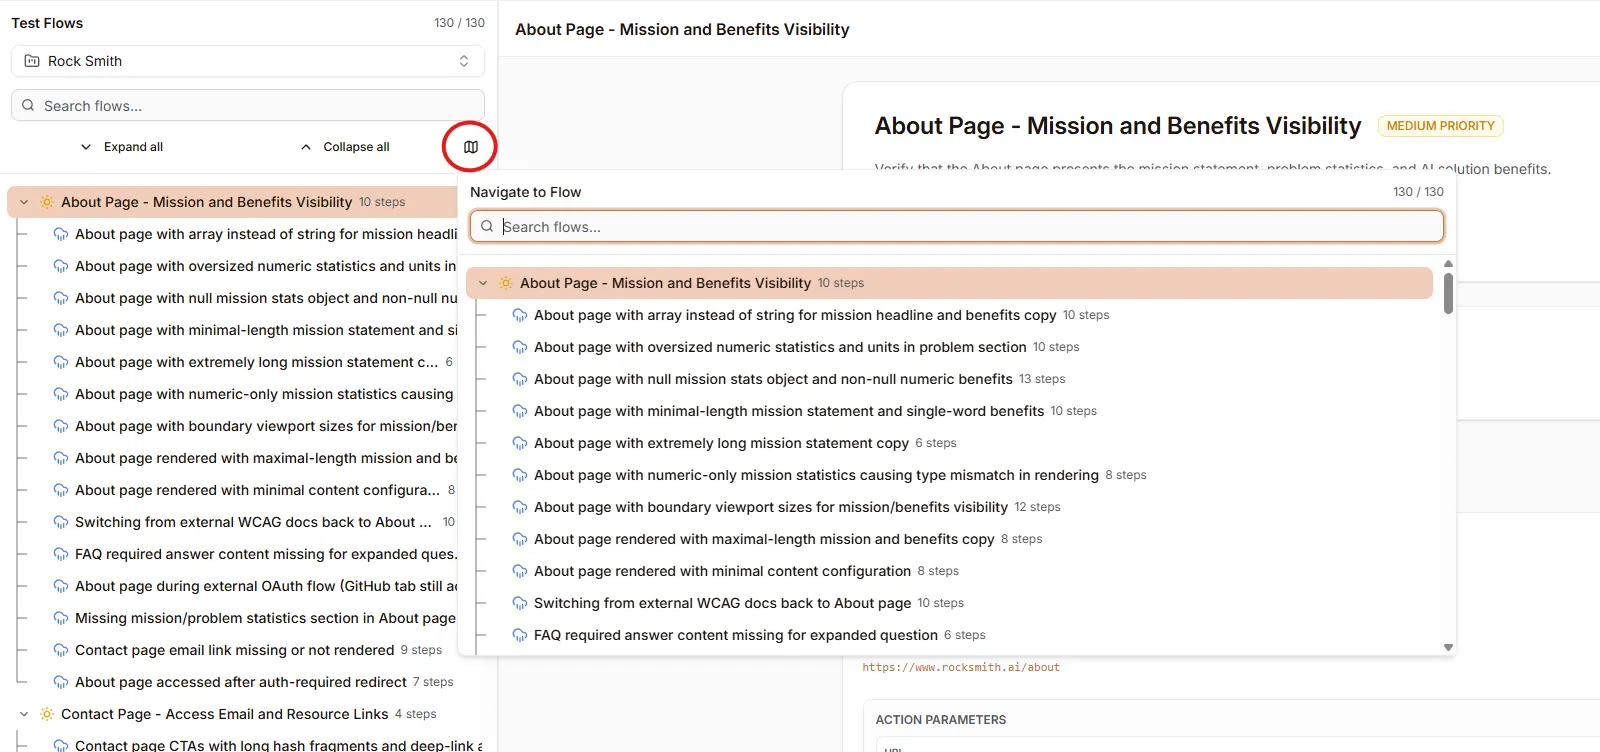
The Flow Tree Navigator provides:
- Hierarchical organization: Parent flows with their edge case variations nested beneath
- Quick navigation: Search and jump to any flow using the navigator popover
- Step counts: See how many steps each flow contains at a glance
- Expand/Collapse: Manage visibility of flow groups
Flow Structure
Steps and Actions
Each step in a flow performs a single action. Rock Smith supports 19 action types organized into five categories:
Navigation Actions
| Action | Description | Parameters |
|---|---|---|
navigate | Go to a specific URL | url (required), open_in_new_tab, wait_for_navigation, timeout |
go_back | Navigate to the previous page | None |
scroll | Scroll the page or element | direction (down/up), pages (number of pages to scroll) |
switch_tab | Switch to a different browser tab | None |
close_tab | Close the current browser tab | None |
Interaction Actions
These actions require element targeting to identify which element to interact with.
| Action | Description | Parameters |
|---|---|---|
click | Click on an element | Element target only |
double_click | Double-click on an element | Element target only |
right_click | Right-click on an element | Element target only |
hover | Hover over an element | Element target only |
Input Actions
These actions require element targeting and additional input parameters.
| Action | Description | Parameters |
|---|---|---|
type | Type text into an input field | text (required), clear_first (clear field before typing) |
select_option | Select an option from a dropdown | option_text (required) |
upload_file | Upload a file to a file input | Element target only |
submit_form | Submit a form | Element target only |
send_keys | Send keyboard keys | keys (e.g., "Enter", "Tab", "Escape") |
search | Perform a search action | query (required), engine (google, bing, etc.) |
Page Actions
| Action | Description | Parameters |
|---|---|---|
extract | Extract data from the page | query (what to extract), extract_links, start_from_char |
Control Actions
| Action | Description | Parameters |
|---|---|---|
wait | Wait for a condition or duration | duration (seconds), wait_for_element, condition, timeout |
done | Mark the flow as complete | None |
custom | Execute a custom action | instruction (natural language description) |
Action Parameter Details
Navigate Parameters:
url: The URL to navigate toopen_in_new_tab: Open the URL in a new browser tabwait_for_navigation: Wait for the page to fully load before continuingtimeout: Maximum time to wait for navigation (1-60 seconds)
Type Parameters:
text: The text to type into the input fieldclear_first: Clear existing text before typing (useful for editing existing values)
Scroll Parameters:
direction: Scroll down (default) or uppages: Number of viewport pages to scroll (e.g., 1.5 scrolls one and a half pages)
Wait Parameters:
duration: Fixed time to wait in seconds (max 60 seconds)wait_for_element: Wait for an element to appear instead of a fixed durationcondition: Natural language description of the condition to wait fortimeout: Maximum time to wait before failing (1-60 seconds)
Extract Parameters:
query: Description of what data to extract from the pageextract_links: Also extract links from the pagestart_from_char: Start extracting from a specific character position
Search Parameters:
query: The search query to executeengine: Search engine to use (google, bing, duckduckgo, etc.)
Semantic Element Targeting
Rock Smith identifies elements using natural language descriptions enhanced with contextual information—not CSS selectors that break when UI changes.
Element Context Fields
For actions that interact with elements (click, type, select, etc.), you define the target using these fields:
| Field | Description | Example |
|---|---|---|
| Label | Semantic description of the element | "Submit button", "Email input field", "Settings menu item" |
| Position | Location on the page | "top-right corner", "below the form", "in the navigation bar" |
| Text | Visible text content | "Sign In", "Enter your email", "Learn More" |
| Type | Element type | "button", "input", "link", "dropdown", "checkbox" |
Writing Effective Element Descriptions
Describe elements as a user would see them:
- "The blue Submit button below the form"
- "The email input field with placeholder 'Enter your email'"
- "The navigation menu item labeled 'Settings'"
- "The red Delete button in the top-right corner"
Tips for reliable targeting:
- Be specific but flexible: "Submit button in the login form" rather than just "Submit button"
- Include visual context: Add color, position, or icon cues when multiple similar elements exist
- Avoid implementation details: Don't reference CSS classes or IDs in descriptions
- Use visible text: Reference button labels, link text, or placeholder text when available
Self-Healing Tests
Because semantic targeting describes elements by appearance and context, tests automatically adapt when UI changes. If a button moves or changes styling, the AI still finds it based on the semantic description.
Assertions
Assertions validate that your application behaves as expected. Add assertions to any step to verify outcomes.
Available Assertion Types
| Assertion Type | Description |
|---|---|
visual_verification | Verify the visual state of the page or element |
element_visible | Check that an element is visible |
element_hidden | Check that an element is hidden |
element_exists | Check that an element exists in the DOM |
text_visible | Verify specific text is visible on the page |
url_matches | Verify the current URL matches a pattern |
url_not_matches | Verify the current URL does not match a pattern |
page_title | Verify the page title |
navigation_occurred | Verify that navigation happened |
accessibility_check | Run an accessibility validation |
performance_metric | Check a performance threshold |
custom | Custom assertion with natural language description |
Adding Assertions
- Open a flow step
- Click Add Assertion
- Select the assertion type
- Provide a description of what to verify
- Save the step
Running Flows
Once you've created a flow, you can view its details and execute it to test your application.
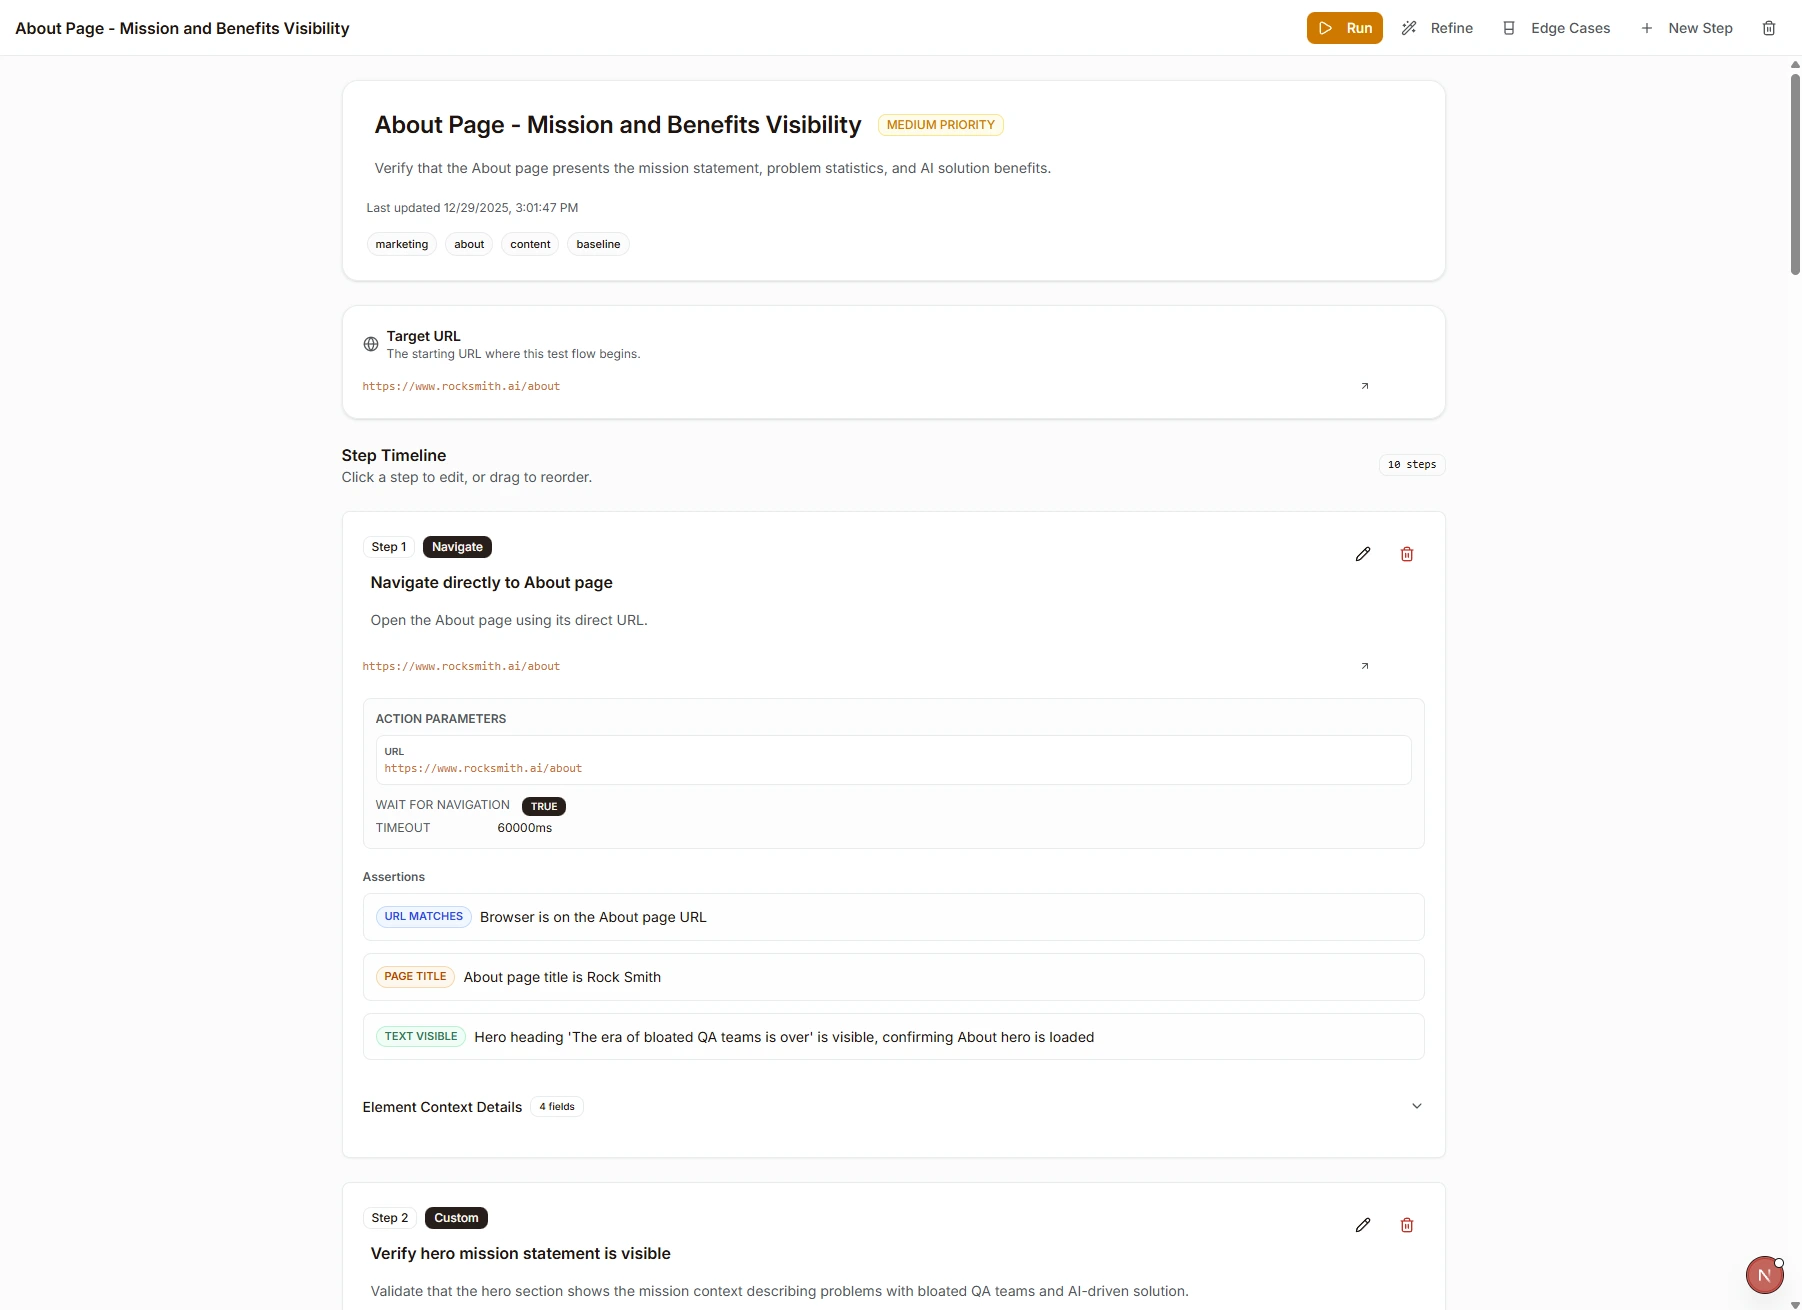
The flow details page shows:
- Flow name, description, and priority
- Tags for organization
- Target URL where the test begins
- Step Timeline with all steps, their action types, parameters, and assertions
Execute a Flow
- Open a flow from the Flows list
- Click the Run button in the top-right corner
- Configure execution options in the dialog:
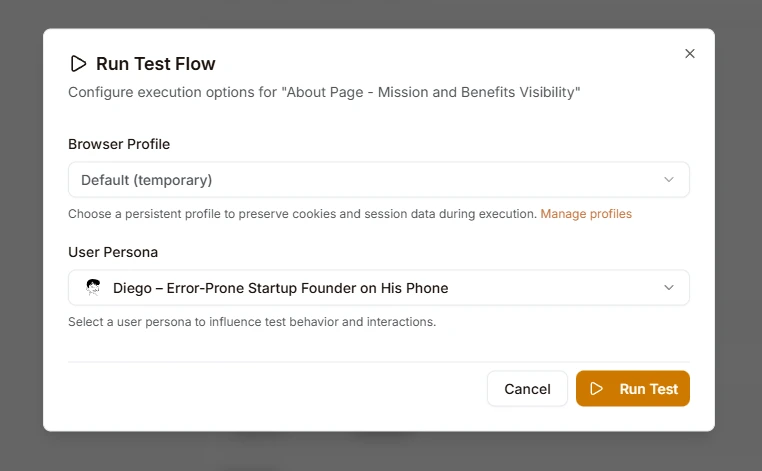
- Browser Profile: Choose a persistent profile to preserve cookies and session data, or use the default temporary profile
- User Persona: Select a persona to influence test behavior and interactions (e.g., simulate different user types)
- Click Run Test
Real-Time Monitoring
During execution, monitor progress in real-time:
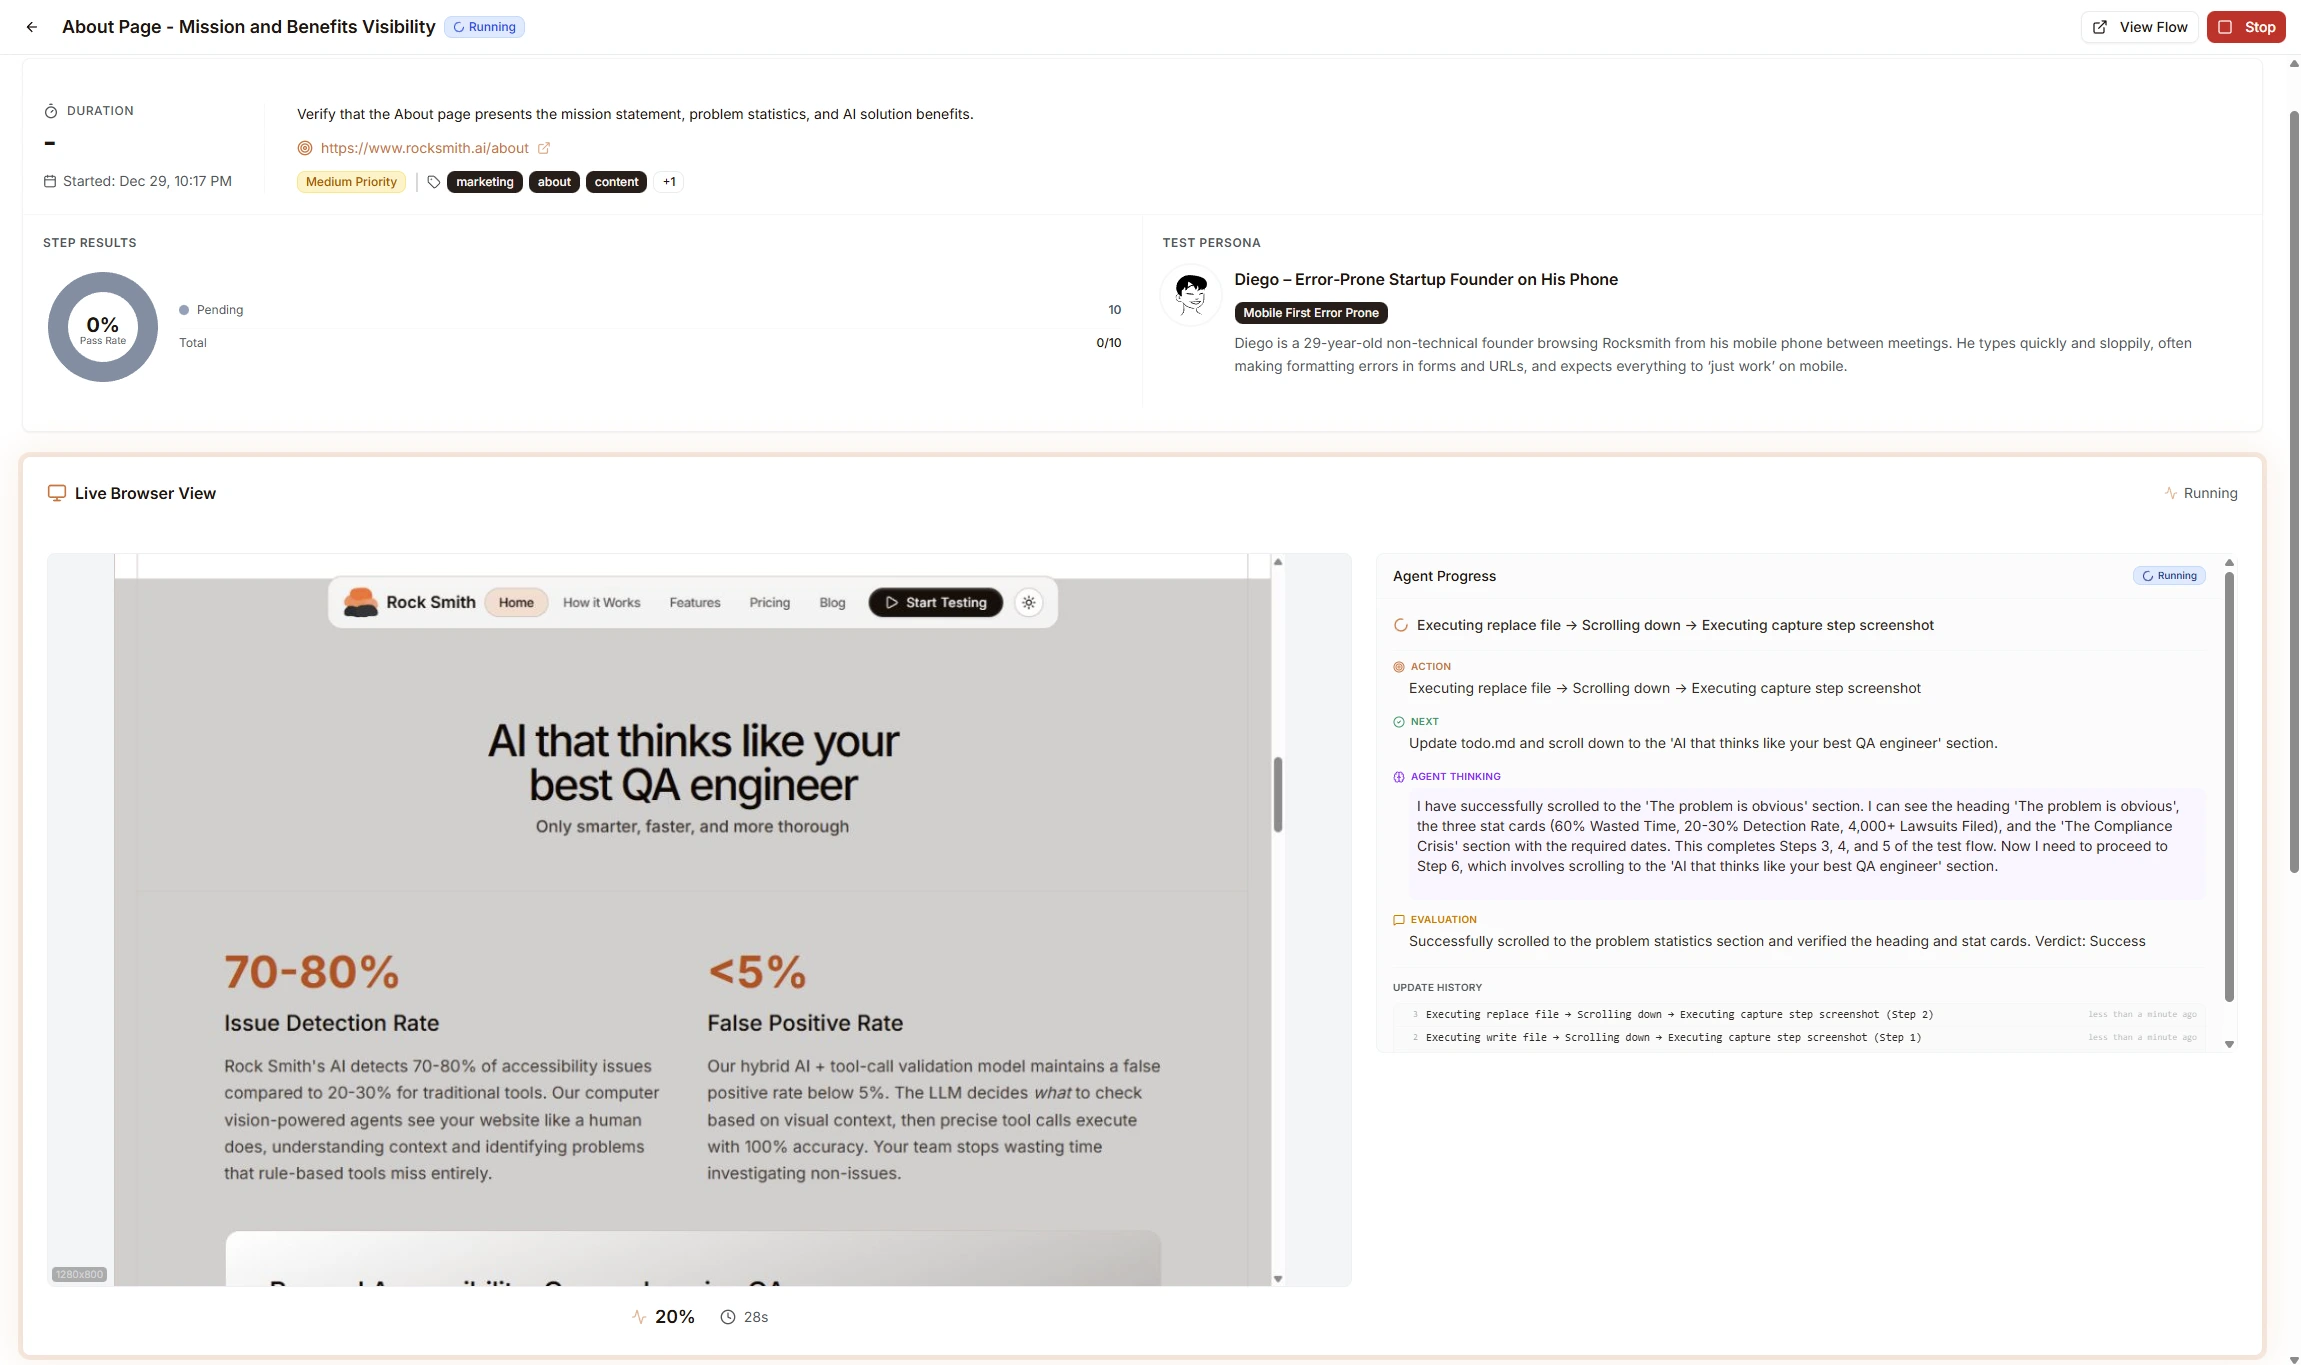
The live execution view includes:
- Live Browser View: Watch the AI interact with your application in real-time
- Step Results: Track pass rate and see which steps have completed
- Test Persona: View the active persona influencing test behavior
- Agent Progress Panel: See what the AI is currently doing
Agent Reasoning
The Agent Progress panel displays the AI agent's reasoning as it executes each step:
- Action: Current action being performed
- Next: The upcoming step in the flow
- Agent Thinking: The AI's reasoning about what it observes and how to proceed
- Evaluation: Success or failure verdict for each step
This transparency helps you understand how the agent identified target elements, why certain actions were taken, and what the agent observed on the page.
Execution Results
After a flow completes, review detailed results:
Step Results
Each step shows:
- Status: Pass, fail, or skipped
- Screenshot: Visual state at that step
- Duration: Time taken to complete
- Agent Reasoning: AI explanation of actions taken
- Assertion Results: Individual pass/fail for each assertion
Execution History
Access past executions to:
- Compare results over time
- Identify flaky tests
- Track improvements or regressions
- Export results for analysis
Best Practices
Flow Design
- Keep flows focused: Test one user journey per flow
- Use descriptive names: "Login with valid credentials" not "Test 1"
- Add meaningful assertions: Verify actual outcomes, not just navigation
- Use semantic descriptions: Describe elements as users see them
Element Targeting
- Be specific but flexible: "Submit button in the login form" rather than just "Submit button"
- Include visual context: Add color, position, or icon cues when elements are similar
- Avoid implementation details: Don't reference CSS classes or IDs in descriptions
Maintenance
- Review failed tests: Use agent reasoning to understand failures
- Update descriptions: If UI changes significantly, update element descriptions
- Organize with projects: Group related flows together
- Use discovery sessions: Let AI identify elements when building new flows
Next Steps
- Discovery Sessions - Explore your site automatically
- Edge Case Testing - Generate test variations
- Managing Credits - Optimize credit usage
- Browser Profiles - Test authenticated pages